INSTALLING NEW DRAWERS AND SLIDES
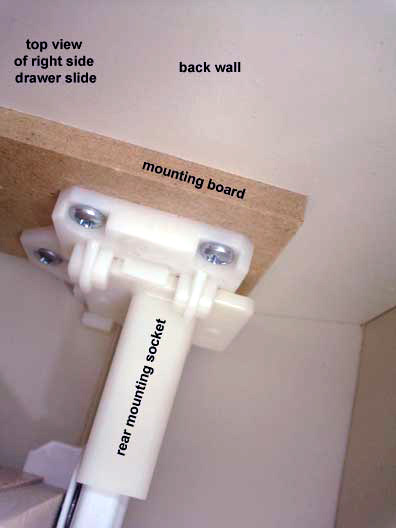
1. Slide the left and right plastic end pieces (sockets) only slightly (about 1â€) onto the slides, so when they are installed into the cabinet box, you will have to push the slide further into the socket, and they will have enough pressure on them to stay in place before you actually screw in the socket at the back of the slide.
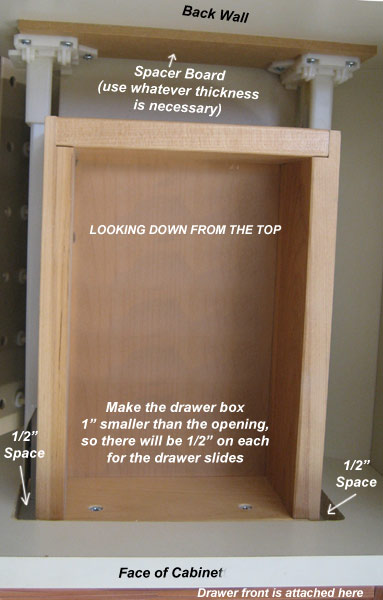
2. Starting with the RIGHT cabinet slide member, set the slide (the one with the roller capturing hooked top) in the right hand lower corner of the drawer opening and push it back further into the socket until it is flush with the front of the cabinet. Install a screw into the front face of the cabinet through the slide member to hold it generally in place. (Drywall screws work well for this because they are very sharp).
3. Mount the LEFT cabinet slide member the same manner.
4. After the two cabinet slide members are connected to the front of the cabinet face, insert the drawer box, ignoring the left slide for now. Move the RIGHT rear socket up and down, and left and right until the front of the drawer box lines up with the front of the cabinet.
5. While holding the right cabinet member slide at the rear plastic socket, mark a pencil line on a CORNER of the socket for reference, then remove the drawer box again. Line the RIGHT socket on the mark you made and screw it in with as many drywall screws as you want.
6. Reinsert the drawer box and move the loose LEFT side cabinet slide member into place at the back so the drawer lies evenly on all 4 rollers of the 4 slide members. You can move the Left member around to find the perfect fit. (not too high, not too low, not too loose and not too tight), and again mark a corner of the rear socket with a pencil line so you will know where to screw it in.
7. Remove the drawer box again and screw the LEFT cabinet slide member into place. Reinstall the drawer box and check that the drawer box lies flat on all the rollers and rolls freely. Check the front of the box again (with a ruler or the drawer front) to make sure that you have mounted it squarely with the front of the cabinet. If not, then move ONE or BOTH sockets around until the front of the drawer box is square to your satisfaction.
8. To mount the drawer front to the drawer box, we recommend that you use double faced tape (foam squares work well), so you can visually line up the drawer front and stick it to the drawer box before permanently mounting with screws. Once the drawer front is stuck to where you want it, open the drawer and drive three or four 1" drywall screws through the box and into the front to permanently affix the front to the drawer box.
9. NOTE: You can either countersink thebolts for the handles into the drawer front using the screws that came with the handles BEFORE you permanently mount it, or you can drill through both the drawer front and the drawer box AFTER it is mounted. However, if you elect to mount the handles this way, you will have to buy longer bolts. You will need a bolt aprox. 1 ½" long or more to accomplish this.