Tools you will need:
• tape measure• 150 grit sandpaper or sanding block • razor knife • scissors • ack cloth • hammer • self-adhesive applicator • 4†straight-edge or putty knife • adhesive spray or varnish • carpenter’s glue • drill • touch-up kit (optional) • screwdrivers: flathead and phillips • miter box & saw • finishing nails for molding VERY IMPORTANT BEFORE YOU BEGIN
Check all items for correct size, and quantity. PREPARE FACE FRAMES AND END PANELS FOR PRESSURE SENSITIVE VENEER.
 • BEFORE BEGINNING, PLEASE READ ALL INSTRUCTIONS.
• Remove your old doors by removing the screws from the hinges (F.3). If you plan to use the old hinges, keep hinges and screws together in a convenient location.
• Remove drawers from the cabinets and set aside. We’ll be replacing the drawer fronts in Step 3.
• Next, remove any cabinet moldings (F.4). You should be able to pull it up easily using the tip of a flathead screw driver.
• Remove any loose and/or peeling coatings from any surface you plan to cover with pressure sensitive veneer. Any depressions left in the surface should be filled with wood putty and sanded smooth.
• Lightly sand any surfaces you plan to cover with pressure sensitive veneer using 150 grit sandpaper (F.5). DO NOT USE A POWER SANDER. Just scuff the surface. This will ensure a good bond when applying pressure sensitive veneer. Clean the surface with tsp or a mild dishwashing liquid and water. DO NOT WET-SOAK, especially if the wood surface is exposed. Rinse with a damp rag and allow to dry thoroughly. Use household ammonia to remove wax. Read the manufacturer’s warning and instructions before using.
• Remove any dust or sanding particles with tack cloth before applying pressure sensitive veneer.
• If you plan to use a door design to cover end panels (using a door for an end panel), apply them after self-adhesive covering has been applied to face frame. Important: Self-adhesive coverings are very strong but are designed to adhere to a finished surface. They will not bond to raw wood. A light coat of brushed on or canned spray lacquer on any raw wood surface is necessary. Some installers apply a light coat of lacquer to the entire front of cabinets after they are clean of any dust, wax or oils for extra adhesion. Make sure the lacquer is completely dry before you begin applying the veneer. Cover End Panels and Face Frames NOTE: If you plan to paint existing cabinet boxes, consult a your local paint and finish store for proper finishing techniques. 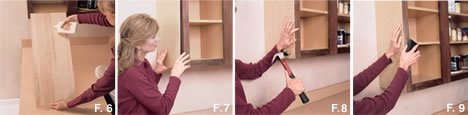
End Panels:
• Start by applying the cut-to-size plywood to the cabinet end panels. Apply a construction adhesive to the back of the plywood (F.6), then fit it to end panel, making sure it is flush with the cabinet front and bottom (F.7).
• Use finishing nails to secure (F.8).
• Using sanding block with 150 grit sandpaper, sand the edges of the plywood to ensure that it is flush with cabinet front frame (F.9). Use a clean tack cloth to remove the sanding dust.
• Check entire cabinet for areas where unfinished wood is exposed, such as along the sanded edges of the plywood, and seal with spray adhesive or varnish (F.1 0) .
Pressure Sensitive Veneer:
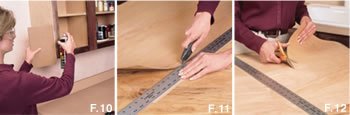
• Cutting with a sharp pair of scissors or razor knife and straight edge, cut the self-adhesive covering into strips 1/2†wider and 2†longer than the face frames you plan to cover
(F.11 & F.12). NOTE: Complete one opening at a time
 Stiles:
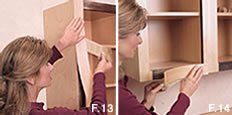
• Apply self-adhesive covering to cabinet face frames. DO ONE OPENING AT A TIME. Start with the stiles. Peel back just enough backing from the top of the strip to anchor the strip to the face frame. Make sure the top edge of the strip is flush and square with the top of the stile. Align the strip so that there’s an even overlap on both sides of the stile (F.13). Then press and lightly smooth downward, peeling the backing off as you go. (Be very careful to get it lined up right the first time, because the special adhesive makes it very difficult to get off!)
• Repeat above on other stile.
Rails
• Peel back just enough backing from one end of the veneer and position it to overlap the left and right stiles by 1â€. Align the strip so that there’s an even overlap on top and bottom of rail. Then press and lightly smooth left to right, peeling the backing off as you go ( F.14).
• Repeat above on other rail. NOTE: COMPLETE ONE OPENING AT TIME
 Trimming Overlap from Stiles and Rails:
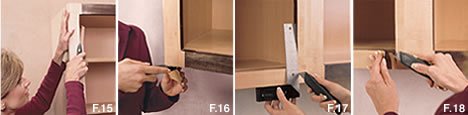
• Using a razor knife, trim the overlap excess inside the opening from both stiles and rails. Use the inside of the face frame as a guide (F.15).
• Trim the overlay from the top and bottom of the cabinet ( F.16). Using straight edge, align it flush with the inside of the stile, extending over where the rail butts the stile.
• Use straight edge as a guide and cut all the way through both the stile and rail veneer (F.17). Using the tip of the razor knife, remove the rail excess. Again using the tip of the razor knife, gently raise the veneer off the rail and remove the excess trim from the stile (F.18). Gently smooth the rail veneer back down to the stile. Rail should now be flush with stile. Repeat on other three corners.
Note: Complete one opening at a time
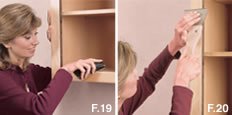
• Using sanding block with 150 grit sandpaper, sand one direction toward the inside of cabinet box to smooth the veneer even with the inside of the cabinet face frame (F.19)
• Using the veneer applicator or a Plexiglas scraper, apply as much pressure as possible to the veneer. Go with the grain (F.20).
Hang Doors and Drawer Fronts Hinging & Hanging Doors:
• Place hinges about 2†from top and bottom of doors. Then secure the hinges on door to the frame. If re-using old hinges, place hinges so screws make new holes.
• Refer to instructions provided with hinges.
Preparing old drawer box to accept new drawer fronts.
• When replacing the drawer fronts, you must first determine whether your drawer boxes are three-sided or four-sided.
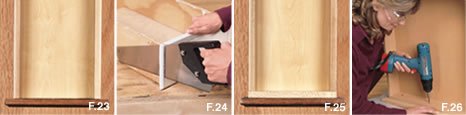
• If the drawer front makes the forward wall of the drawer box, then you have a three-sided drawer box( F. 2 3 ) .
• If the drawer front is mounted to a separate piece that makes up the forward wall of the drawer box, you have a four-sided drawer box(F.25).
• Remove drawer slides from the old drawer box.
Three-Sided Drawer Box (F.23):
• Using a saw, trim the drawer front so that no edges extend beyond the top, bottom or sides of the drawer box (F.24). This allows the old drawer front to fit inside the drawer opening.
• Hide rough edges by turning the box around. The old drawer front should now be in the back of the drawer box.
• Replace drawer slides, making sure they are centered and flush with the front edge of the box.
• Center the new drawer front on the box and temporarily secure with screws (F.26).
• Slide the drawer box into the opening to check alignment. Adjust as necessary, then tighten the screws.
Four -Sided Drawer Box (F.25):
• Remove the old drawer front, being careful not to damage the drawer box.
• Re-attach drawer slides.
• Center the new drawer front on the box and temporarily secure with screws (F.26).
• Slide the drawer box into the opening to check the alignment. Adjust as necessary, then tighten the screws. 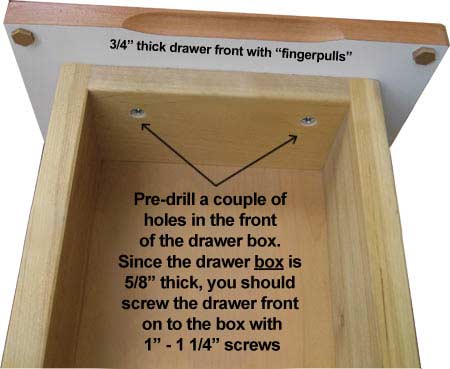
|